Tuesday, December 9, 2014

Photography tip: How to take a nice photo of the Moon?

Photography tip: How to take a nice photo of the Moon?
I wanted to test my new camera (Panasonic FZ200) so decided to take a photo of the moon. Out of the box, like 99% other cameras, the photo was bad. I changed Metering Mode to SPOT and took the photo again. Metering mode is in Set Up for any camera and usually gives three options: Smart/Evaluative/Matrix, Partial/Center-weighted, Spot. When you select Spot, camera looks at the light in the center only. Bring the Moon in the center of your screen and camera will do the job correctly. Try with your camera and let me know.

Most cameras use by default Smart/Intelligent/Evaluative/Matrix based logic for metering. That works well in most situation where light is more or less uniform. However if you have some very dark and some very bright spots in your photo, try switching to Center Weighted or Sport metering and you will see what you would like to see in your photograph. Also metering off of faces can get you better skin colors in portraits and in photos of people. Normally, I rarely use Maxtrix/Evaluative/Smart metering mode on my cameras.


Now here is a photo with Metering mode set to Spot:

Wednesday, September 24, 2014

SLR vs Compact (Fixed Lens) cameras


SLR Cameras:
Advantages:

·         Normally better image quality which stands out indoor or in low light compared to small compact cameras
·         Provides to ability to control Depth of Field (or selective focusing) to keep certain things in focus everything else out of focus. The kit lens are limited in this capability but you can achieve greater control with fast or wide aperture lenses.
·         You can change lenses and use many accessories like external flash, remote control, filters, extension tubes, macro tubes etc.
·         Better build, better life.
·         Normally they offer lot of manual controls
Issues:
·         Bulky and difficult to carry around
·         Normally expensive. Accessories like lenses etc can also cost significant money.
·         In good light or in outdoor use, there is not much advantage unless filters are used.
Compact Cameras:
Advantages:

·         They are cheaper.
·         Easy to carry around. Compact in size.
·         You can get tremendous zoom up to 60x in some of the cameras. This comes vary handy in outdoor photos and in travel. It is difficult to get this kind of zoom in SLR cameras.
·         In outdoor, good light, they are as good as any camera. They work great in landscape cameras or in situations where you want most things in the scene in focus.
·         Compact cameras offer macro shots. In macro mode, camera can focus on things very close to camera. To get similar ability in an expensive SLR, you will need a dedicated Macro lens. By nature, compact cameras offer great macro photography.
Issues:
·         Many models do not offer enough manual controls
·         They struggle in low light or in indoor photography
·         Don’t have options to use many accessories like different lenses, filters, external flash etc.

·         It is difficult to achieve bokeh or background blur with small sensors and tiny lenses.

Camera comparison iPhone5 vs iPhone6

Looks like in Auto mode (without any setting), iPhone5 and iPhone6 have more or less very similar picture quality. One noticeable difference is that iPhone6 camera is more wide angle.
Here is a photo taken with iPhone5:
Photo with iPhone5
 Here is a photo with new iPhone6

Photo with iPhone6
Besides being wide angle, looks like iPhone6 lets you control exposure right on the screen. Tap the screen and a metering circle will come up with a + sign. Touch it and it it will let us increase or decrease the exposure. The cool part is you will be able to see the impact of it live on the screen so you can decide which exposure level to use.
If you have just iPhone5, don't worry. You can still set us exposure by touching various parts of the screen. Touch a darker object/part in the screen to make the photo brighter or touch a brighter spot on the screen to make the whole photo darker. For details, please see my last post.

Thursday, September 18, 2014

Better Photos With Any Smartphone Camera

Smartphone cameras are more prevalent and more popular than dedicated cameras these day. There are two main reasons. Most of us have a smartphone with us most of the time and this results in an always-available camera. The second reason is that the smartphone cameras are getting better in capabilities. They generally have respectable 8MP resolution and they do pretty good job for day-to-day photography in good natural light.

As you have noticed, most smartphones are fully automatic in nature. They don’t let you do manual focusing or select aperture, shutter speed or ISO. Thy generally have just one or two controls. They generally let you select Flash. Other than that, there is nothing else you can do.

Advantages of phone cameras:
·         Easy to use.
·         Always Available: We have them with us almost all the time. There is no need to carry an extra gear!
·         Shortest response time: Compared to a typical camera which you have to take out of the bag, turn on, focus and shoot, a phone camera is always on and you can take a photo in a fraction of a moment.
·         Offers Auto-backup: In your traditional camera, your SD card can go bad or can get lost but most camera phones automatically backup photos in cloud storage.
·         HDR and Panorama: Unlike traditional cameras, most smartphone cameras these days offer HDR and Panorama shots. With HDR, you can easily take day light, high-contrast photos with more details than a regular capture. The Panorama offers you to take wide angle shots very conveniently.
·         Wide Angle photos: Most phone cameras are naturally wide angle so you can cover more without needing to change a lens.
·         Macro photography: Smartphone cameras are great for good light macrophotography. No need for a macro lens or changing any settings.

Issues with camera phones:
·         Not many controls available. You can’t do much if you don’t like the shot your camera takes.
·         Tiny sensors and tiny lenses limit your ability in low light or indoors. Many times your photo may look better in iPhone’s retina display or Samsung’s bright LCD screens but viewing them on a standard computer monitor or an HDTV, you will see the issues.
·         If you print camera phone photos, most of them may not look as good as photos taken with a dedicated camera.
·         Flash. Most phone cameras have a flash but I think their flash is more of an issue than an advantage. Their Flash is a tiny LED which most of the time will wash out your subjects in photos.


How to take better photos with a smartphone camera?
1.      For taking photos of the landscapes, turn on HDR and take some phones with HDR too.
2.      Many times for landscapes, use Panorama feature to make your landscape photos look even better.

3.      Enable your phone camera to take photos with touching the screen. This is one powerful way to take better photos with your smartphone. When you touch, camera focuses on that particular subject. This way you can control the focus in your camera. The area you touch also tells camera to expose based on the light in that area. If you touch a dark area in your frame, your smartphone will think that the scene in front of it is dark so it will take in good deal of light. This can result in more details but some parts getting washed out. On the other hand, if you touch some brighter area, the phone will think that the scene is too bright so it will take in less light. This will result in an under-exposed darker photo.

Here is an example. On my hike, I took a photo of Simi Valley, CA in Auto mode (I mean just pressing the Capture- Shutter Release button):


Now if I wanted to get better sky colors, I would need to tell my iPhone to take in less light. To achieve this, I touched the sky in the frame. Here is a photo which captures the sky colors well:


Now if I want to over expose the phone, I would touch the darkest part (most towards the bottom of the frame). Here is a photo with much more light in. It has much more details but the sky is washed out:

If you are reading this article on a bright table or a phone, you may not see the variance in light but on an IPS monitor (or in reality), all 3 photos have different exposure/light. Also, I am not telling you which photo is better here but I am trying to show you that you can control the light intake or exposure with a smartphone camera even though there may be no button there.

Wednesday, September 3, 2014

Want to take beautiful photos of waterfalls?

Want to take beautiful photos of waterfalls? Do you like that milky/silky smooth effect in waterfall photos? You can take such photos too, in most situations, with most cameras. It is not difficult. However in following cases it becomes a sort of challenge.
* Most smartphones or fully point and shoot cameras in many situations will not be able to take such photos. You need a camera that offers some manual controls.
* If you are looking at the waterfall in broad day light, many cameras may run into limitations. In a sort of low light, you are in good luck.

During my tour of Big Island, Hawaii, I came across some waterfalls. After some trial and errors, I was able to take some nice photos with a FujiFilm point and shoot camera.

The first photo I took in auto mode did not take a photo with the silky feel. So changed the camera to Tv/Shutter priority mode and made some adjustments. In few minutes, I was able to take nice photos.

Here are some tips for you.
* It is important that you have a tripod. If you don't have one, find a flat surface where you can put your camera. I didn't have a tripod either but I was able to find a place to put my camera. Many times, I use the strap and put it under the camera to create the angle I need. Takes some time to figure out but if you are lazy like me and don't want to carry a tripod, , this is a small cost. In my experience, in 80-90% of the situations, I am able to find a flat surface to put the camera on.
* Set the camera to Timer mode- 2 seconds or 10 seconds delayed mode. This helps eliminate the shake due to pressing of the shutter release button.
* Change the mode dial to Tv or S mode- Shutter Priority. Set the shutter speed to around .5 second or so. Then if needed, you can change it to 1 second or reduce it to .25 seconds or so.
* Set ISO to 100. If your camera lets  you set the ISO, set it to 100 or the lowest value.

You are all set. Take a photo and see if it comes out well. If the effect is not strong, you can slow down the shutter speed. Let the shutter stay open a bit longer. If the photo comes a bit washed out, you need to reduce the light. To reduce the light, keep the shutter open for less time. In other words, make it faster. As we are shooting in Tv or S mode, camera will choose the Aperture value for us. If you are a bit advanced user, you can shoot in M or Manual exposure mode. Start with Shutter-speed of .5 seconds, f 8 or so and ISO 100. Then as needed, change the values.
If you are shooting in broad light, your photos are likely to be washed out with such a long exposure. One solution to reduce the light is to use ND Neutral Density filter. This filter is like sunglasses or a tinted film. This can help you shoot with longer exposure without getting your photos washed out. In case if you don't have the filter, you can try to put your sunglasses in front of the camera (make sure you clean them) to reduce the light getting on the sensor.
Try this out and let me know if this helps. As I keep saying, if you help your camera, your camera will help you take nice photos. Also, you can take good photos with almost any camera in most of the situations.
Happy shooting.
Here is one more photo I took on that day on the Big Island.
Waterfall, Big Island, Hawaii


Tuesday, September 2, 2014

Want to take photos of stars? Here are some tips.

During my recent visit of Big Island, Hawaii, I was at the Volcano park one evening. As it started getting dark, the sky started filling up with stars. I was busy shooting the red flames of lava and suddenly noticed the stars above me. Unfortunately, I was running out of time as my family wanted to go find a place to eat. I tried to take few shots but I had no luck. Taking good photos of the star-filled sky is a difficult job. Expensive equipment does have an advantage here. An iphone or a compact camera can not help you take nice photos of the sky. An SLR with a kit lens can help you to some extent but a Full Frame camera with an expensive/fast lens can help you a lot.
The next day, I was visiting Mauna Kea and had decided to try to take some photos of stars. I googled to get some tips for astro-photography to make it easy. Then I brought along few lenses and tripod with me. As it started getting dark, there were even more stars than the previous night. It was cold but I was determined to try my best. After some trial and error, I was able to take some decent photos.


If you also want to try to take photos of the sky at night time, here are some tips:
  • Pick your best/most expensive camera. Bigger the sensor, better it will be.
  • For lens, try to pick a wide-angle lens which is also a fast lens. I know it is difficult to find a wide angle lens which has also a wide open aperture. I didn't have such a lens so I used the kit lens of my Pentax K-30. In some photos, I also used a cheap Fish-eye lens (8mm Rokinon)
  • Focus the camera to infinity. If you lens has the distance marking, just move it to infinity. Then change the Camera from Auto-Focus (AF) to Manual Focus (MF). Make sure the focus ring does not move. If you have a tape, just tape the focus ring to lens body so you don't lose focus ;)
  • If you camera has Long Exposure Noise Reduction, turn it off.
  • Set camera to Manual exposure mode. In the manual exposure, you will need to set ISO, Aperture and Shutter-speed.
  • Set ISO to 3200 or even 6400. 
  • Set Aperture to the most wide open value you can get. 
  • Set the lens to the most wide angle (lowest mm value). As I had a kit lens, the lowest I could go on 18-55mm, was 18mm. (I also tried with a fisheye 8mm lens. The wide angle photo above is with the fish-eye lens)
  • Set the shutter speed to around 10 seconds.
  • Change the camera to timer mode(2 or 10 seconds) or use a remote control so the shake due to pressing of Shutter Release button is minimized.
  • Place the camera on the Tripod and start shooting. If you are not getting good many stars, either increase ISO, reduce f (aperture value) or show down the shutter speed to 12, 15, 20 seconds.
Trial and Error will help you get better photos.

Tuesday, July 1, 2014

Ready to shoot fireworks this 4th of July? Here are some tips

4th of July is here. Are you ready to shoot fireworks?
Taking photos of fireworks is not a fun job. I recommend most readers to enjoy the live fireworks instead of trying to take photos to create memories for future joy ;) When you try to take photos, you are in the guessing game. When to click the shutter and how to change settings to make photos come out better. End result is a lost opportunity to enjoy the live fireworks. So my short and sweet advice to most of you is to keep the camera at home so you can fully enjoy those 15 minutes of fireworks. However, if you are like me, I know you are going to try to take some photos of fireworks. If so, read on. Here are some tips for you:
First some Don'ts and then some Dos (tips):
* Don't try to take fireworks photos without a tripod. If you don't have a tripod, find a place to put your camera somewhere so there is no shake. Most fireworks photos require exposure of 2-3 seconds and there is no way anyone can handheld a camera steady for that long period. Any shake and the photo is bad!
* Don't try to take fireworks photos in AUTO mode. If you have a simple camera that has only AUTO mode, see if it allows you to do Exposure Compensation. If so, make it -1 EV.
* I have never tried myself but I don't hesitate to say that don't try to take photos with any cellphone/smartphone or a cheap point and shoot camera.
* Use the Fireworks mode if your camera has it. If there is no fireworks mode, beginners can change to Program mode and change Exposure Compensation to -1 or -1.5.
* If you have an SLR or an advanced Point and Shoot camera but you don't want to get into more detailed settings, just set camera to AV mode. Aperture to 5.6 or 8 on an SLR. For Point and Shoot, use the smallest value. Set Exposure Compensation to -1 or -1.3. Set ISO to 100 or so and take photos. Based on how photos are coming out, you can change settings.
* Focus camera to Infinity and change the Focusing method from AutoFocus (AF) to Manual Focus(MF). If you don't have this feature, you camera may struggle to lock the focus every time you try to take a shot. In dark, it can become a real headache for camera to lock focus. One simple trick: change camera to landscape mode and take one photo. This will normally result in infinity focus. Then change the Focusing method to MF from AF.

I was camping at Dogwoods Campground near Lake Arrowhead in Big Bear area, California. We heard that they had fireworks planned so we went there. Unfortunately I didn't have a tripod so I tried to put the camera on a fence but that fence was not steady as there many excited kids leaning on it. Still I think I managed to get some good shots. Btw Lake Arrowhead had the best fireworks I have seen over last 15 years of my stay in the USA!
Here are some photos with my Olympus E-PM2.


* If you are an advanced user, see the tips from Olympus below:


Setting the scene for fireworks 
Fireworks
Summer is known for great fireworks displays. Olympus is known for great camera scene modes. Coincidence? No way. Your first step in taking great pictures of fireworks is to simply select the Fireworks Scene Mode. The camera will then slow the shutter speed value and set the focusing point to infinity (∞).
If your camera doesn?t have scene modes (i.e. the E-1, E-3 & E-5) or is able to support a high-level of manual control, set the camera to manual mode (M) and adjust the shutter speed and aperture. Setting the aperture to F8 and a shutter speed of 3 to 4 seconds should give good results. Set the ISO sensitivity to 100 or 80. And don't forget to change to MF (manual focus) and set the focusing point to infinity (∞).
Here's a rundown of common adjustments
made in the Fireworks Scene Mode:
Fireworks
  • Shutter speed is set to four seconds, which helps capture the streaming trails of the fireworks.
  • Sets the ISO to 100 and the f-stop to f11.
  • Sets the White Balance to 5300K
  • Sets the exposure compensation to -1.0 EV. This is a full 1-stop underexposure to keep the firework highlights from burning out.
  • Sets the color to Vivid, the Saturation to High and the Contrast to Hard, all of these changes help enhance color.
  • Sets the Sharpness to Soft, which uses minimal sharpening in anticipation of post-processing.

Thursday, June 26, 2014

Sometimes you need to tell your camera to use Flash.

During broad daylight, have you tried to take photos of  people against some nice landscape? Have your photos turned bad with beautiful background but people too dark? You are not alone. Sometimes same happens when a person is under a shadow but the scene is very well lit.
One time, I was hiking with a friend on Rocky Peak hike in Simi Valley with his new Panasonic FZ150 (?) camera. It was a hike plus photography tour on a nice June gloom morning in Southern California. We came across a nice vista that showed Simi Valley covered under low clouds/fog. We wanted to take a photo with my friend in it against this very pretty background. As we shot in Auto mode, as the frame had lot of light out there, so camera took a nice photo of the background but my friend wasn't exposed well. See the photo below:


How do you fix such photos?
As there was enough light in the frame, camera naturally didn't use Flash. Most cameras in AUTO mode would not have used Flash here. Many cameras do the same thing in landscape photography. They keep the Flash off. As my friend was within 10-15 feet from the camera, I just turned the flash to On position. I forced camera to use flash. If your camera, in AUTO or Landscape mode, does not let you select flash, change the camera mode to P (program) or Aperture priority. In these modes, you should be able to select Flash mode. Once we had Flash on, see below our new photo.

As I keep saying on the blog, sometimes you just need to take control of your camera to be able to take better photos.
There are two things to keep in mind. Flash light on most compact camera will not reach beyond 10-15 feet so make sure the objects or persons you like to be brightened up flash are within that distance.
If you are not able to force Flash in a photo, change the mode to Program first. Most cameras have Program mode.

Saturday, May 31, 2014

Taking photos against the Sun? Here are some tips to work around the situation.

Ask anyone and most people say that you keep the Sun on your back to take good photos. That is true because the Sun can brighten up the subject so you can take nicely exposed bright photos. However sometimes it is not possible. You can not move the Sun, right? And many times it is not possible for us to move to bring the Sun behind us. What do you do in such situations? Many of us will blame the situation, or the camera.
I had a similar situation when I visited Disneyland in California a few days ago. I was in the Tomorrowland and wanted to take a photo of the top of the Rocket ride while standing in a line for some other ride. Top of the Rocket ride looked nice but it was too dark because the Sun was also in the same direction.
Here is how I handled the situation. I took a photo in the Auto mode with my Olympus E-PM2 camera.  I let the camera do the metering and do whatever it thought right. I knew the photo will not be good.
Tomorrowland
As you can see, the subject came out very dark. I can't blame the camera or the Sun for this! So I decided to help my camera. By looking at the photo, you can see that the subject/the structure I was shooting was dark. In other words, very much underexposed. So I needed to tell the camera to take much more light in. I was more interested in the subject. I really didn't care if the sky gets washed out. So I clicked on the Exposure Compensation button on my E-PM2. Changed the value to +2 and took a new photo.

Now see the photo below. It was much better than the photo in the AUTO mode. The sky is washed out but
As I have often said on this blog, any camera can do a good job if you are willing to help it in difficult/tricky situations.
There are times when we need to ask camera to take in less light. One case that comes to my mind is when you want to take photos of full Moon. Most cameras do not take good photos of the Moon in AUTO mode but you can move the EV value to -2 (or try with different negative numbers) and you can take nice photos of the Moon. Click on this link to my earlier post about it:
http://photography-with-any-camera.blogspot.com/2014/04/take-good-photo-of-moon-with-any-camera.html


Tomorrowland in Disneyland

Friday, May 2, 2014

Which camera to buy? A Point and Shoot or a DSLR? Which SLR? Canon or Nikon?

Buying a new camera can be a daunting task. There are so many decisions to be made; brand, model, dslr or slr, size, etc. You can spend hours weeding through all the reviews and articles on one and end up right where you started not knowing who to trust.

Let me try to help you make your decision a little easier.
First, try to answer this question:
What will be the primary use of my camera?
 Will you be taking outdoor and landscape pictures or mostly portraits of family and friends? Maybe you don't know and just want something that does a little of everything? Or you do know and want to get into photography as a serious hobbyist and want to become a professional photographer?

Make sure you understand these 2 things very well:
  1. Light is the most critical component in photography. 

The light around you is one single most important factor in photography. As you can see, from this graph below from Olympus site, outdoor mid-day Sun provides lot of light compared to indoor room with dim light- almost 6000 times more light!!! In good light, any camera can do a good job. Most cameras will do more or less the pretty similar job for day-to-day photography.

** For outdoor and travel photography, there is always abundant light. In this scenario, when there is enough light, any camera will do a nice job. Even a smartphone/iPhone camera can take photos as good as an expensive SLR camera. Nikons or Canons, Panasonic FZ200 or LS100- nothing will make much difference in the photos.
--> A smartphone, an inexpensive Point and Shoot or an SLR will NOT make any distinctive difference in the image  in broad day light (I am not including various filters that are added on lenses by professionals that do change/control that light that gets on to the sensor). As such, I often go on hikes and there are times, I specifically take out my iPhone and use it. Not only iPhone is very convenient and handy, but just by changing HDR to ON, you can get vibrant colors in the your photos. Plus, it is very easy to take panoramic photos with an iPhone or any modern smartphone. I don't see any significant difference in photo quality for most of my purposes. I am not taking about professional photography where you do pixel peeking! I am talking about photos that there shared with friends or displayed on Flickr or Facebook or get printed for household use.

Bottom line: If you are an outdoor person or want a camera for travel, buy any camera that looks good to you and your budget. You will not be disappointed. I would give one advice. If you want to be able to zoom in, think of buying ultra-zoom cameras like Panasonic, Kodak, Fujifilm, Olympus, Nikon. Sony or Canon which have 20-plus times zoom. Consider Panasonic FZ200 or Fujifilm X-S1. They are bit bulky but for outdoor and travel photography, they are a delight to have. Panasonic FZ200 has an excellent lens and Fuji S-X1 has a sensor bigger than most other Point and Shoot cameras.

** For Indoor, low light and portrait photographyWe will talk about different scenarios where available light is gradually reducing. A smartphone/iPhone camera will be the first one to disappoint you as light goes down. Its optimized retina display can display your photos clearly but when you print your photos or look at them on a computer monitor, you will realize noise and lack of sharpness. This is because most smartphones have tiny sensors and tiny lenses. They are not able to capture enough light in reasonable time period to create a nicely exposed photo.
Most Point and Shoot cameras will do a much better job than a smart phone indoor or in low light but still you may not like their photos. Money really matters when the light starts getting low for your photography. Many people buy 'expensive' SLRs instead of 'cheap' Point and Shoot cameras thinking that they are wonder machines but when the light is not sufficient around you, even the latest models like Canon T5i or Nikon D7100 will disappoint you!

You need to remember this:
* In good light, any camera will do a decent job.
* When the light is going down or you are indoor in insufficient light, smartphones will become useless first.
* Imagine that light is reduced further. At some point, most point and shoot cameras will stop giving you good photos. SLRs and expensive point and shoot cameras will still do some decent job.
* Reduce light further down. Now it will be a challenge for most consumer grade SLR cameras too. They will struggle to give you good photos. However professional grade full frame cameras and fast lenses (F1.8, F1.4 etc) can still help you take photos.

2.  Second important thing in photography is YOU. 

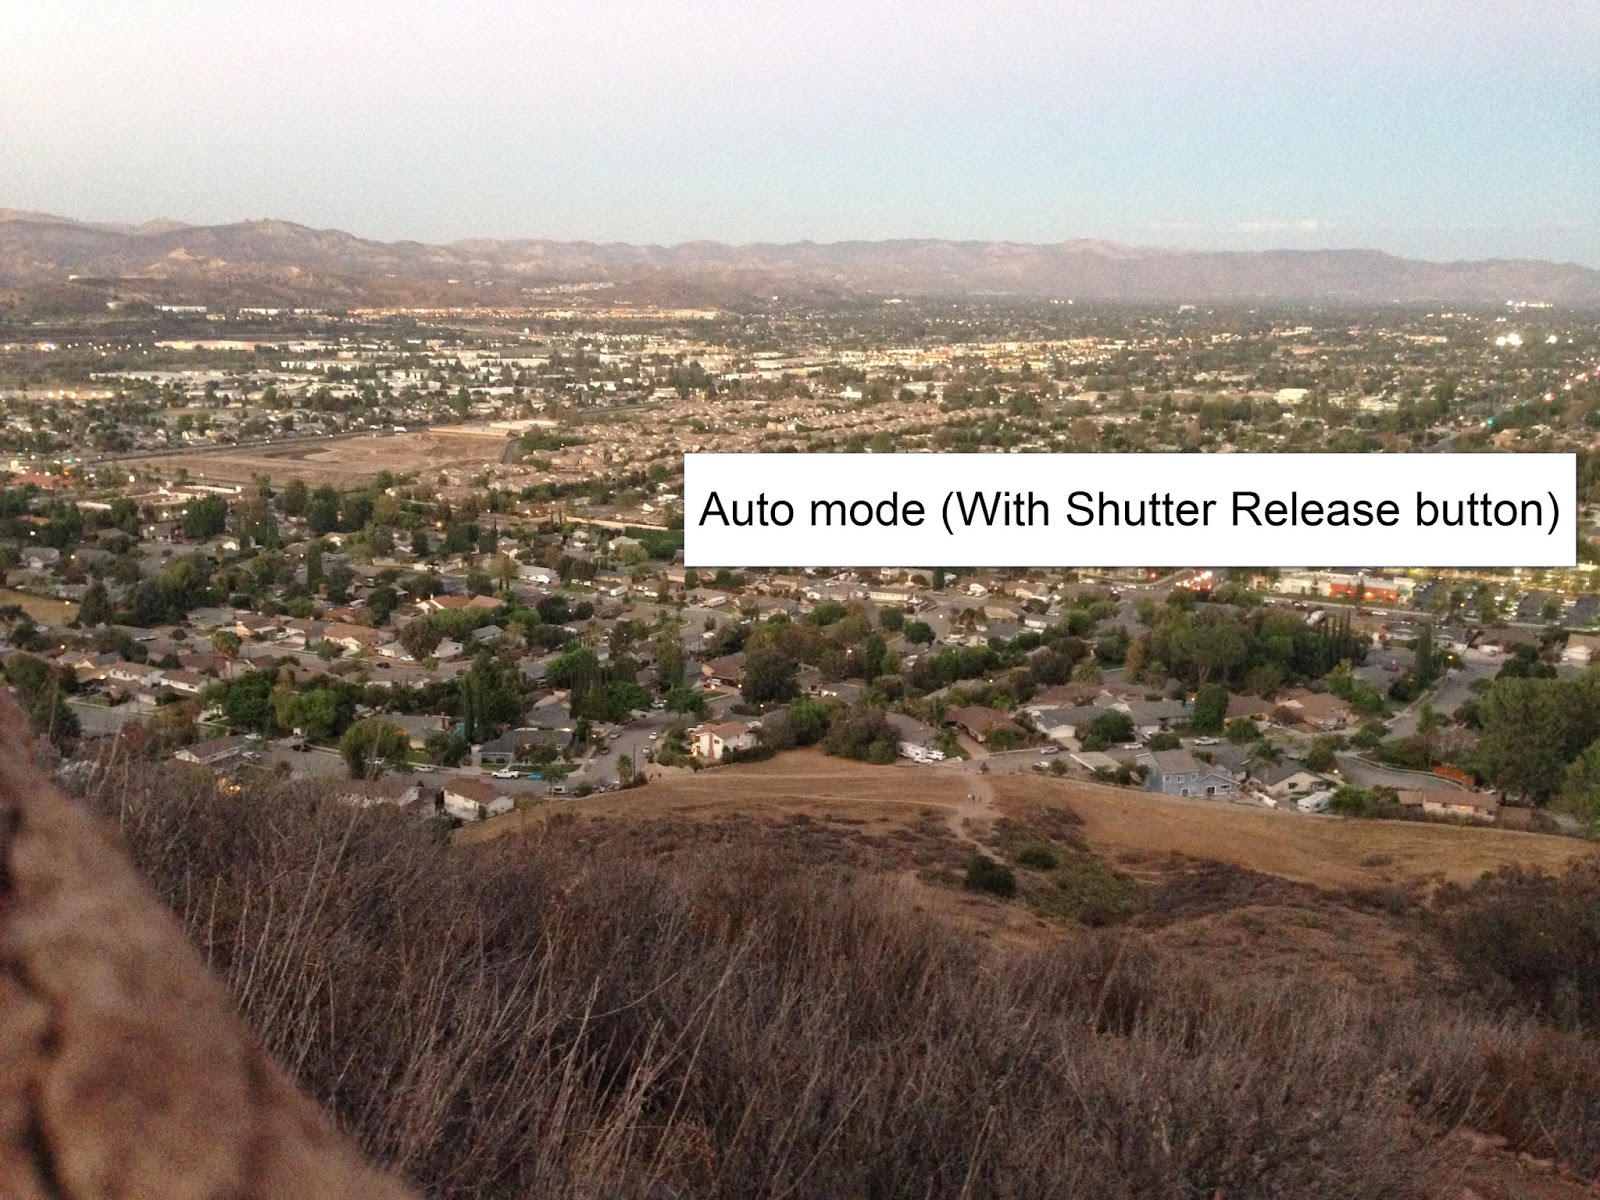
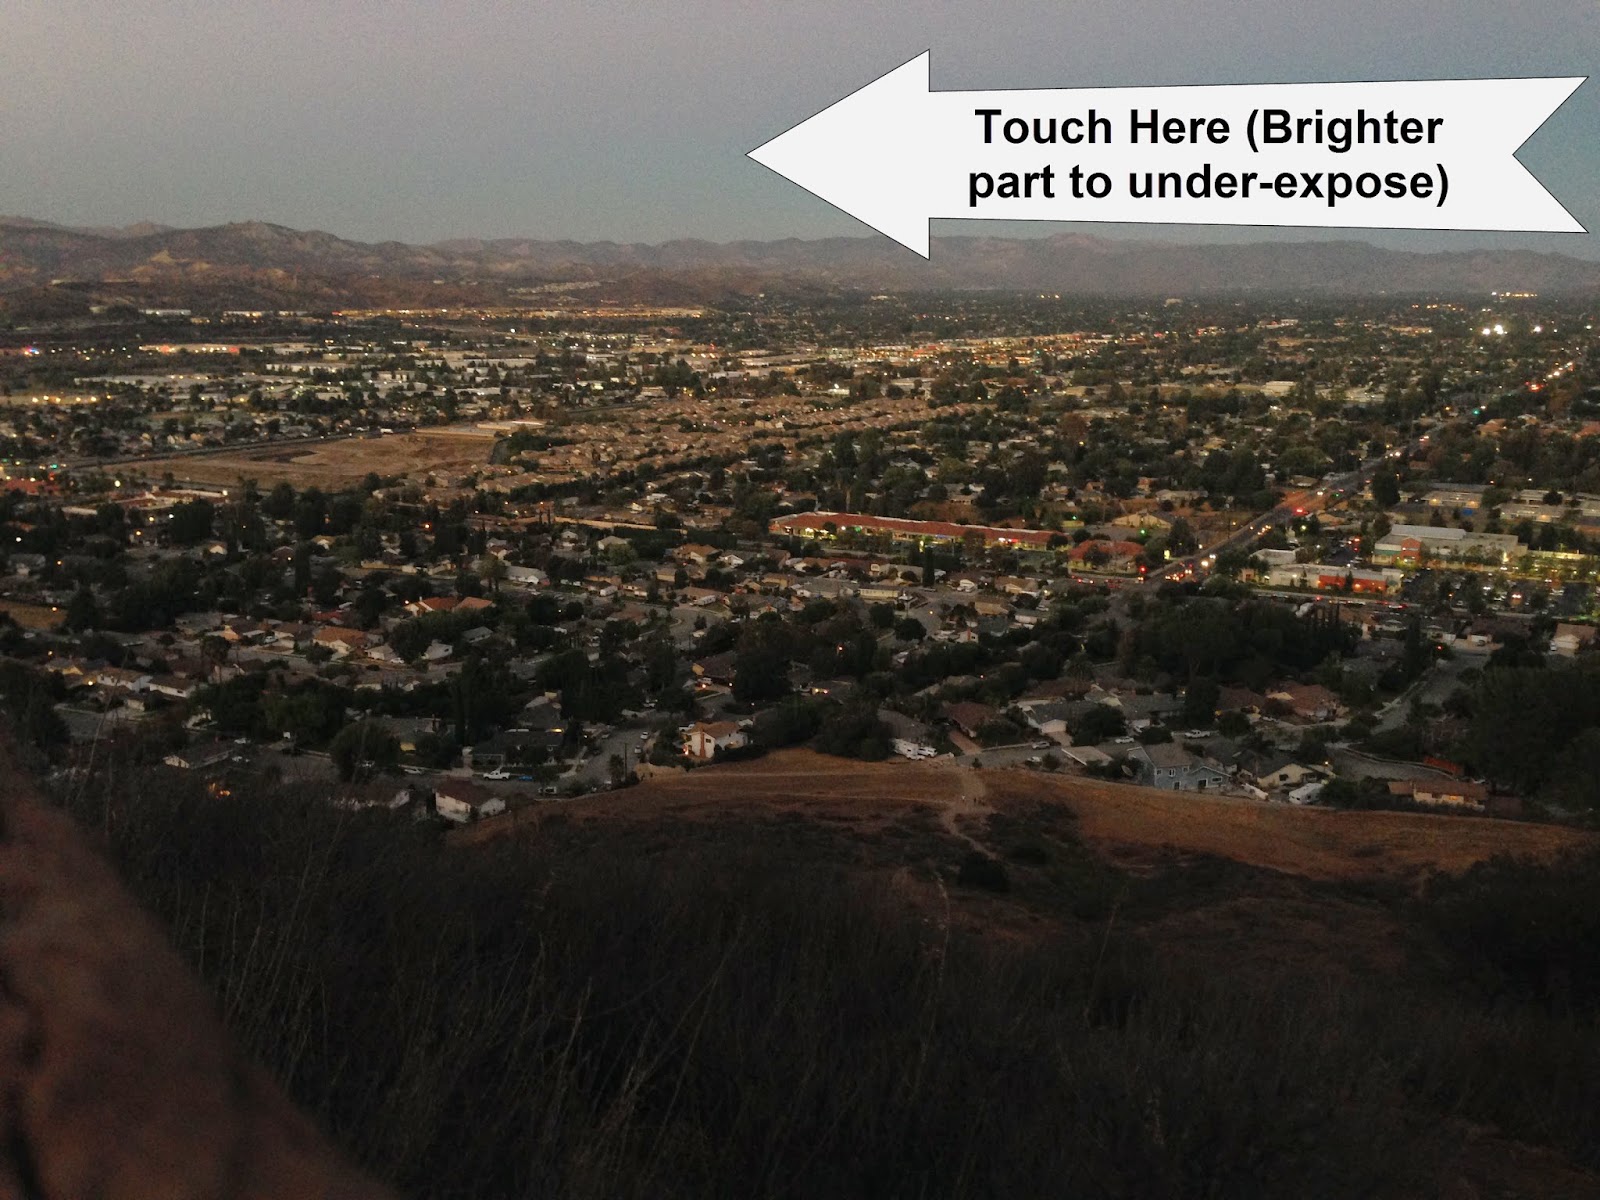
Now in low light or awkward lighting situation, when most cameras fail to take good photos in AUTO mode, it is not your camera's fault; most consumer grade cameras are just not capable of taking good photos in such situations. However you can still manage to take better photos in certain situations with any camera. For that, YOU will need to help you camera. You don't need to be an expert photographer. Just within 2 hours you can learn some important techniques which can help you take better photos with any camera.
Some of the things you need to be aware of are Exposure Compensation, Timer function, taking photos without holding your camera in your hands, etc. If you want to get your feet more wet, you can learn basic things about Av, Sv or M mode and you will be able to take good photos in many situations in which your camera in AUTO mode disappoints. You can get over the limitations of available light and the technical limitation of your camera gear. It wouldn't matter if you are using a Nikon or a Canon brand. As long as sensor size and the lenses are similar, all cameras are created equal IMHO. Even an Olympus, Pentax or Sony will do equally good job. However it is you, your skills and your techniques that matter the most when the light and situation starts getting challenging.

What kind of Camera to buy then?

After using variety of camera brands, camera models and cameras in different sizes and capabilities, this is what I have learned. Consumer grade SLRs are good but I wouldn't recommend them for most when you take into consideration their bulkiness and inconvenience like changing lens, being not able to take macros, zoom out etc.
Here are my recommendations:
1) If the primary use of your camera is indoor and is for taking photos of your kids, pets, family members and friends, and if your budget allows it, buy an entry level SLR, or a mirrorless Micro Four Third camera system like Olympus PEN or Panasonic GF series. No need to go for an expensive camera like Canon 60D or Nikon D7100.
For most of us, Nikon D7100 is not a better choice compared to Nikon D5200 or D3200. No doubt D7100 is a better camera but for most of us, it is not worth to spend extra $500 on something that we probably don't need. D7100 has a better durable body, takes more photos consecutively (frames per second), has more controls on the body, etc. However do we need this? Most of us don't let our 5-8 year old kid hold our SLR camera ;) When we are this much careful, no point in paying for extra durable camera body. Most of us have no need or reason to shoot photos in rain. 90% of SLR camera owners normally don't use multiple-shots/faster shooting. So personally, I would advise you to save those $500 and spend them on some good fast lenses, external flash etc. A fine 35mm or 50mm F1.4 or F1.8 lens can help you take great portraits and indoor photos that most kit lenses wouldn't be able to do.
2)  If you need a camera for outdoor use or for travel, I would advise you to avoid an SLR. They are bulky, changing lenses is an hassle and then also in good light, they are not better than most P&S cameras or smartphones!
For outdoor and travel use, I would recommend you to buy a ultra-zoom cameras. These are a bit bigger than most P&S compact cameras but they have great zoom which can help you get closer to the object and take photos. Currently Panasonic FZ200 is a great camera. Fujifilm also offers some great choices at great prices. Canon and Nikon also have good cameras. You can click on this link here and see on Amazon some of the highly rated cameras with ultra long zoom

If you don't want to carry around a big camera but like the convenience of Point and Shoot camera, you can click on this link and see some highly rated consumer favorite cameras. Make you choice. Try to pick a camera that has a bigger sensor, faster lens, manual controls like Aperture-priority (A), Shutter-priority (S) and Manual (M) modes. Such controls can come handy IF YOU want to help you camera take good photos in some challenging lighting situations.

3) Best of both worlds.
If you want good photos indoor or in low light and also want to have convenience, you can look for Micro Four Thirds cameras or cameras like Canon EOS-M, Pentax K01, Nikon 1 series etc. These are great cameras. They are affordable, their sensors are much bigger than most point and shoot cameras, also offer all flexibility of an SLR camera. They are much easier to carry around. Plus with some cheap adapters, you can use old lenses (in manual mode) that can help you take photos as good as those taken with $2000-$5000 range.
Click here to look at some great camera systems that are highly rated on Amazon.

Recently my favorite cameras are Canon EOS-M, Pentax K-01, Panasonic GF and Olympus PEN cameras. People sometimes complain about their slow auto-focus but frankly for me and you, it really doesn't matter- at least in 95% of shooting scenarios. It is only in dark, low light, these cameras will struggle but I have learned to live with it. Sometimes, these cameras don't include Flash! I would like to go for a camera with built in flash or I would buy and external flash. Flash can come handy indoor or in low light.
On the plus side though, many of the cameras I have listed above come with great kit lenses (when compared with bigger counterparts like Nikon D3200/D7000 or Canon T5i/60D. As an example, Canon EOS-M comes with a great STM lens. Pentax K-01 has a nice tiny XS 40mm F2.8 lens! I bought both of these cameras for around $300! Their lenses are worth around $200! Both these cameras have excellent image quality and are very easy to carry around.
There is one more benefit in carrying such smaller cameras. When you are shooting, most people wouldn't take you seriously! Hence you can take candid photos of people.
Regarding video also, these hybrid cameras work very well. You can buy a cheap adapter on eBay and can use any old lenses. I often use old Super Takumar lenses on with my hybrid/MFT cameras and they give very good video and still images. Simply you can't compare their video with any consumer grade SLR camera with kit lens. Super Takumar 50mm F1.4 lens and Canon EOS-M/Pentax K-01 cost less than $400 and that is the best value in my opinion.

When going out on hikes, or taking photos of flowers etc in Macro mode, Point and Shoot camera like Fujifilm X-S1 works very well. I use Pentax K30 only when I am asked to take photos in some party or when I want to take nice portraits. I use it with Pentax 50mm FA F1.4 lens or with old M42 fast lenses like Super Takumar.

Happy photography. Enjoy taking photos.
(Grammar and spelling will be fixed shortly when the article is read by me again.).


Tuesday, April 15, 2014

Take a good photo of the Moon with any camera

Yes, you can take a nice photo of the Moon with almost any camera. Most of us have tried at some point but without much success. Many times we would blame our camera but it is not camera's fault. In my opinion, 99% of cameras in Auto mode would fail to take a good photo of the Moon. DSLRs are included. Now in this article, I am going to show you how to take a nice/better photo of the Moon with any camera you have. Most cameras have Exposure Compensation. It is like a button with + and - sign. This is a very important button in your camera IMO. This button helps you tell you camera to take in more or less light. So if your camera has this button, and hopefully, a manual or shutter priority mode, you can take a nice photo of the moon. Plus, if your camera has good amount of optical zoom, it really helps you to take a nice close up.
Now most smartphones don't have Exposure control for their cameras and hence it is very difficult to take a good photo of the Moon with your iPhone or Android phone.


Why do most cameras not take a good photo of the Moon in Auto mode?
It is very simple. Most cameras don't know anything about the Moon LOL, The Moon is there normally in dark sky. It glows like a bulb. Now every camera is trained to taken in good amount of light to created a nice bright photo. As most of the sky in the frame is dark and the moon is comparatively too bright, this fools the camera and hence your moon comes out like a big white circle.

How to take good photos of the Moon then?

Tip#1: AE/AutoExposure.
Most cameras do metering (a way to figure out or measure light in front of the camera) in mostly two or three different ways. There are different names but normally they are Center, Center weighted or Multi/Intelligent. Most camera makers by default use the matrix or an intelligent method for metering. In this method, camera looks at the whole frame to determine how much light to take in to make a good exposure/picture. As for the Moon in dark sky, except moon, everything else is dark. So camera is told (or we can say fooled) to take in more light than it should.  If you are familiar with this setting, change it to Center or Center weighted. Then when you take photos, keep the Moon in the center. For some cameras, setting AE to proper method will do the trick for you.

Tip#2: EV or Exposure Value/Compensation.
This is another way to tell the camera to take in more or less light while taking a photo.
Yesterday, I used Fujifilm X-S1 camera to take some photos of the Moon. There was a nice Lunar eclipse l(April 15, 2014) so I was thinking to take some photographs. Plus, it was a full moon and whenever I have a new camera or a lens, I try to test it. When it is a long zoom camera, this exercise is a great fun. Fujifilm X-S1 is a decent camera with 26x zoom.
First I put the camera in Auto mode. I knew it wouldn't do a great job but just wanted to confirm it. I am probably hoping to find a camera one day that out of the box takes nice photos of the full Moon!
As you can see, the photo came out as a big white circle. Also, the Moon isn't perfectly round in the photo!
This is common for most cameras. The camera is fooled by the dark sky so it tries to take in more light! Once we know this problem, we can try to fix it. We want our camera to take in less light. Create a sort of dark photo. Once easy way to do this is to set a proper Exposure Value.
Now when I tried to lower the Exposure on the Exposure Compensation but like most cameras, X-S1 did not let me change exposure! It is an Auto mode so camera tries to do everything its way!! If your camera also does not let you change the EV, change camera mode to Program or Shutter Priority.


Now I changed the mode to Program ('P') mode and took another shot. It was similar but came out a bit better.

Now I clicked on the +/- button  (the Exposure Value EV Compensation) button and moved it to negative -1. This tells camera to take in half the light. The EV scale looks like this in the photo here. You normally use the scroll buttons or some other buttons on the camera to increase or decrease the value. When you want your camera to take in more light, move the slider to some positive value. When you want your camera to take in less light, move it some negative number. The further you move from 0, the camera takes in more and more or less and less light.
 

See below how the photo has come out with -1 Exposure Bias.


The photo was much better and now people can see it as the Moon. However I wasn't completely satisfied. So moved the EV to -2 and the camera tried to took much less light. The sky was all black but the Moon was perfect.


Even after setting the EV to the lowest value on your slider, you are not able to get a good photo of the Moon, you can do the following:
* Lower ISO: If ISO is set at some value higher than 100, move it lower to 100. See if this helps.
* Change camera to Shutter Priority. This becomes a bit challenging for most of us but I am going to keep it simple for you. Open up the last photo. Most cameras will tell you Aperture (f value), shutter speed and ISO used in the last photo. Take a note of the Shutter speed. Now in Shutter Priority, make the shutter speed faster. This is done by increasing the value. If the value was say 100 (which is actually 1/100 second, or 10 milliseconds), change to 200 and take a new photo.
Play with some values here and shortly you will have a nice photo of the Moon with your camera.

As I always tell people, most cameras are good. They just get lost sometimes in low light or in some awkward situations. If you are willing to help it in its struggle, like a good dog, your camera will please you with some beautiful photos.
If you liked this posting, here is another good one which talks about how to take photos against the Sun by changing EV to some positive value.
http://photography-with-any-camera.blogspot.com/2014/05/taking-photos-against-sun-not-always.html

Enjoy photography.


Tuesday, March 18, 2014

How to take great photos?

Very simple. Follow this stream of decision points:

  1.  Check Light: Light is your biggest friend in photography. If light is in your favor, any camera will go a nice job and take good photos. Even cellphone can take nice photos. If light is not right, most cameras will struggle. 
  • Decision 1(a). Determine quantity of light. In low light (I mean when quantity of light is low), generally it is a tough job to take good photos. Let me give you some tips. 
  • Decision 1(a)(i) Look at your subject.
    1(a)(i)-A. Is your subject stationary or a moving/living item?  If you are shooting a moving or a living thing (like human, animal, flowers etc), you have limited choices particularly when light is low. You do not have the luxury of keeping lens open for too long else the subject movement will blur the photo. So what to do?
    *Use a camera with bigger sensor or use expensive fast lenses. I mean money matters here. Expensive gear works better in low light, up to some extent.
    * Put camera to Tv- Shutter priority mode. Set the shutter speed to say 1/50 or faster. Boost up ISO to 800 to 32000. (For latest or expensive cameras, you can go for bigger numbers but for an average point and shoot camera, do not go beyond 800. Take the photo. If it is good, you are done!
    * If the photo is still not good, use artificial light. Turn on some light if available or turn on Flash on your camera. With flash on, if the photo is washed out, lower ISO to 100 or 200 and retake the photo. You can also make shutter faster but with Flash on, most cameras can not be set to shutter faster than 1/160 or so.
  • 1(a)(i)-B. If your subject in low light is not moving, you are in luck.
    * Try tips above in 1(a)(i)-A. If the photo comes out good, you are done! If the photo is blurry or noise, you can try to take even better photos with tips below.
    * Use a tripod or put your camera on some solid platform. Turn on Timer mode. Set camera to Av- Aperture priority and use a value like f/4 to f/8. Set ISO to 200 to 1600 depending on the camera. Let camera decide shutter speed. Focus the camera and take a photo.
    * If the photo turns out too bright, use EV/Exposure Compensation to -1 and take a photo again. Play with 2-3 different EV values. Or set camera to Exposure Bracketing so it will take 3 photos in 3 different exposures. Keep the photo that looks nice to you.
  • Decision 1(a)(ii). If the quantity of light is good, you really don't need any expensive camera. Set the camera to Auto mode, or any more appropriate mode and take photos.
  • Decision 1(b): Determine *quality* of light. Normally in low light, quality is not a critical factor. However when the quantity of light is high (or there is abundant light), quality needs some attention.
  • How to determine quality of light? Light can be homogeneous (sorry if I am inventing a new meaning here) or too-contrasty. Light in morning or in evening (before sunrise or after sunset), or in a cloudy day is an example of homogeneous light. However if you under the Sun in broad day light, if you carefully see, certain things like Sky are too bright but shadow or trees can appear pretty dark (only when compared to bright sky). This is an example of too-much-contrast.
    Few tips to avoid light's quality issues:
  • 1. First and foremost. Try to shoot outdoor photos or landscapes in early morning or in late evening. Before sun rise or after sun-set is the best time for landscapes. Or pray god for a cloudy day.
  • 2. If you are taking photo of people or some objects, try to keep the Sun behind the camera/photographer. This can expose people nicely. (If eyes are getting too dark, you can turn on Flash). If people are wearing caps or hats, request them to remove them so eyes become visible.
  • 3. If you are taking landscapes in broad daylight, some objects may turn out to be too bright or too dark. If there are trees in your frame, trees may come out dark if you try to keep sky blue. If you try to expose trees (or relatively darker objects) in your photo better, the sky will get washed out. In such situation, 
  • 3a. If your camera has HDR mode, turn it On. You can even use an iPhone which has nice HDR capture.
  • 3b. If the objects are nearby and they are turning dark in your image, turn on the Flash. 

  • Got to go LOL. More later.

Tuesday, February 11, 2014

Tips on how to make passport photos at home.

Tips on how to make nice passport photos at home:

  1. Try to find a white wall or a white bed sheet/large paper. Keep it as a background.
  2. Find a place where there is good light that falls directly on the face. Try to avoid standing next to a window or door to avoid uneven light on the face. Make sure whole face is uniformly exposed.
  3. Take a photo in the Auto mode. If it comes out well, fine. If the light is not good, photo may be blurry or  noisy.. You can try taking a photo with Flash on. If the flash creates any shadows, most online passport photo services like http://ipassportphotos.com or http://www.onlinepassportphoto.com would be able to remove the shadow. Supply them one photo with flash and one without flash.
  4. If you don't want to use Flash and photo is coming out blurry or  noisy, follow these tips. If it is blurry, probably the shutter is open too long. Change to Tv (Shutter Priority mode) and set shutter speed to be no more than 1/75 seconds. (Mostly for such photos, subject person will be standing still for this much time). 
  5. If the photo is coming out noisy, the ISO is probably too high. Try to set an upper limit on the ISO. Use the ISO mode (if available) or set ISO upper limit so camera can choose the value but not above the top limit you have set.If you are using a compact camera, do not use ISO more than 800 for most cameras. For SLR, you can go up to 3200 (or even more if you SLR is 2012 or older model).
    Set Camera to Manual mode. Then set Aperture to the widest open (lowest number) and Shutter speed to 1/75. Take few photos. 
  6. If the photo is coming out too dark, it is because camera is set on intelligent metering option. The while background will fool camera to underexpose the photo. If possible, change metering mode to a Point or Center only mode. This will make sure the face gets nicely exposed.
  7. Once you move your photos to the computer, crop it as shown below in photo#2.


Take few photos with different settings. Once you have a good photo, use some free tools/websites to crop your photo to make passport photos you need. For USA, you will need 2x2 inch photos.
Once personal advice. If you doubt the photo you have taken, it is worthwhile to spend few bucks and get your photo fixed by using services like http://ipassportphotos.com or http://www.onlinepassportphoto.com . When we are paying hundreds of dollars to renew a passport or get some visa, why not buy piece of mind by having someone fix your photo and make photos in the right size and as per the specs you need. Remember, US passport photos are very different than passport photos used in Canada, UK, Australia, Germany, Japan, China or any other country. Each country has own requirements when it comes to photos for passport or visa. Good luck.