Thursday, October 15, 2015

How to capture lightning photo with a cell phone or any camera.

As people say the best camera is the one that is with you. It was time to go to sleep and my 8 year old told me about lightnings in the sky. We rarely get lightning in California sky. It is even rarer commodity than the rain in California LOL. I watched out the window and saw it happen 2-3 times. I took out my cell phone and tried to take a shot.
The first one I shot without changing any settings. It was a disaster! Camera fired flash and the flash reflected back to the lens so the photo was a waste. I immediately got in to trial and error method.
Turned off flash. I knew I need to have a dark image. Any camera, including smart phone cameras, try to make photos bright so I went to settings, tapped on Exposure value and told camera to set it to -1.5. Once  you click on Exposure Value, a line will come up with values from say -3 to +3. You set it to more negative when you want to tell camera to take in less light. You can set it to positive to tell camera to take in more light. Here I wanted my Samsung Note 4 to take less light. This setting has one more important side benefit. As I asked camera to take in less light, it resulted in faster shutter speed. This can reduce any chance of shake due to holding the camera in hand. This is a big benefit in low light so I often underexpose my photos when I don't have a tripod.
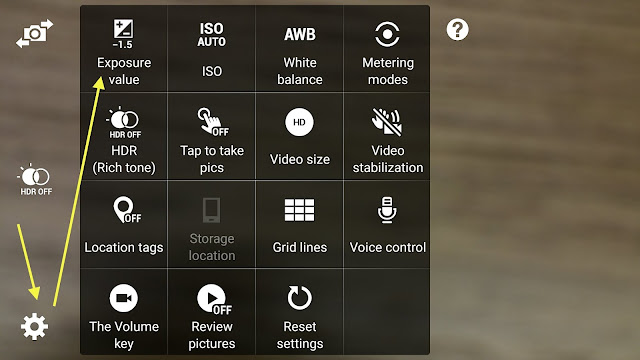
Note 4 Samsung Camera settings
smartphone screenshot

Then I started taking photos. The first photo was as much dark as I wanted but there was no lightning.
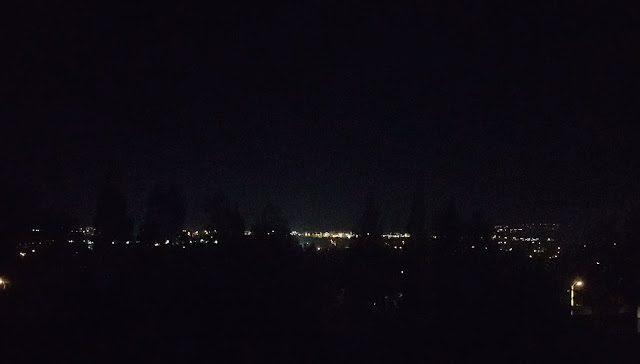
Photos with -2 EV

Now comes the real Trial and Error. You don't know when lightning will fire so I kept clicking photos. After 10 or so trials, I was able to catch it in the photo. Though quality wasn't great but I was able to get a photo of lightning which I though I would never be able to take!
Lightning photo with cellphone

One more alternative for lightning photos:
There is another way to take photos of such uncertain things. Many new cameras which record 4K videos also let you save individual frame as a photo! Many new Panasonic cameras have 4k video so to make it easy, shoot a video and then take the best frame and save it as an image.

As I keep saying, it is not difficult to take good photos with any camera.

Tuesday, September 29, 2015

Light- How much light is around us and what does it mean for photography

While deleting some images on my computer, I came across this old image/graph that mentioned typical light intensity for different situations. This can be helpful to know limitation of cameras in low light. If you want to take good photos in low light with your iPad or iPhone and if you are not able to do so, it is not your fault.
In graph below, we are not supposed to remember various numbers but this one does show how dramatically light varies from situation to situation. In outdoor under mid day Sun compared to a bright indoor room, light intensity is 500 times more! When you compare this bright mid day under Sun to an indoor dim room, the light intensity is 6000 times more!

Clear Full Moon light is around .03 Lux. Typical Starlight is around .001 Lux.


So up to 500 Lux, a handheld camera can take good sharp photos IMHO (my guess). However to take good photos in situations with lesser light, we need either a tripod or faster and/or bigger sensor cameras and a stationary

Practical considerations for Light and Exposure in day to day use:

* iPhone 6 has widest aperture of 2.2. Assuming ISO of 400 (beyond 400, images will be grainy) and very stable hands, you can take shutter speed of 1/75 seconds.
With this, the lowest light you will need to take sharp good photos with your iPhone 6 is around 226 Lux. This means in brightly lit homes or in offices to outdoor photos, an iPhone or any latest smartphone camera can be useful.
If you like to use ISO at 100 only, you will need 907 Lux of light intensity.

* On the other extreme, high end full frame SLR with a fast lens of f/1.2 can take good photos even at ISO 3200. Assuming same shutter speed of 1/75 seconds, it can take good photos in light as low as 9 Lux!

If you have a Lux meter, you can use this equation (Lux= Square of F number * 1/shutter speed * (250 /ISO)) for determining the variables like Shutter Speed needed, or ISO needed for a given aperture. The discussion in this post is  mostly to get a feel about what is going on when you press the shutter release button in any camera. In reality, when you press the button, the sensors and computers inside you camera, takes the reading of the light in the frame and uses some equation like above to set up aperture opening, shutter speed and/or ISO depending on the mode. If you shoot in Manual, you provide the numbers and camera stops thinking. If you are in A or Av mode, you tell camera what value to use for aperture. If you have set up ISO too, camera will determine shutter speed based on some equation like the one above.

So ignoring bokeh or image sharpness with faster lens and bigger sensors on DSLR, an iPhone or any smartphone or a fixed lens camera can take good photos in light that is 200 Lux or more. This means well lit indoor or bright outside. With bigger bodies and more investment, you can go down as low as 10 Lux hand-holding your camera which would be Family living room lights, relatively dim indoor, office building hallways or very dark overcast day.

Now with a tripod and if you subject is stationary, you can go and shoot in almost any situation. If you want to shoot stars though, you need only a high end DSLR as if you go beyond exposure of 10-20 seconds, you will capture movement of stars.

Hope this helps.

Sources:
If you want to get into technicality of exposure, here is a nice summary on DPReview chat. Not sure if it is accurate but it mentions that

N^2/t = L*ISO / (10/0.67)

....for ISO = 100, N = 2.8, t = 1/100, and a calibration constant K = 12.5, the required luminance would be about
L = 2.8^2*100*12.5/100 = 98 cd per sq. meter
to produce a middle grey tone in your final image. Illumination is trickier, and a typical calibration constant is 250 for incident light measured in lux. So for this same example we would need
L = 2.8^2*100*250/100 = 1960 lux.


I know LUX is very confusing measure compared to meter or centimeter for length, pound or kg for weight or second/minute for time. Lux measures intensity of light. Instead of getting into technicals of it, I would rather remember relative values so you can understand how it affects photography.
If you want the definition of Lux, here it is from Wikipedia.

"The lux (symbol: lx) is the SI unit of illuminance and luminous emittance, measuring luminous flux per unit area.[1] It is equal to one lumen per square metre. In photometry, this is used as a measure of the intensity, as perceived by the human eye, oflight that hits or passes through a surface. It is analogous to the radiometric unit watts per square metre, but with the power at each wavelength weighted according to the luminosity function, a standardized model of human visual brightness perception. In English, "lux" is used in both singular and plural.[2]"

Here are some examples of the illuminance provided under various conditions:(Source: Wikipedia

Examples
IlluminanceSurfaces illuminated by:
0.0001 luxMoonless, overcast night sky (starlight)[3]
0.002 luxMoonless clear night sky with airglow[3]
0.27–1.0 luxFull moon on a clear night[3][4]
3.4 luxDark limit of civil twilight under a clear sky[5]
50 luxFamily living room lights (Australia, 1998)[6]
80 luxOffice building hallway/toilet lighting[7][8]
100 luxVery dark overcast day[3]
320–500 luxOffice lighting[6][9][10][11]
400 luxSunrise or sunset on a clear day.
1000 luxOvercast day;[3] typical TV studio lighting
1000025000 luxFull daylight (not direct sun)[3]
32000100000 luxDirect sunlight

Saturday, August 8, 2015

Mobile phone camera versus a regular camera: Something your mobile phone camera can't do!

Want to join for this hike today (September 16, 2015)?
Some, generally rich, folk will gather at this place today and talk about how to make rich richer in this country. Cursing but not offering any viable solution on immigration or healthcare... Millions of us will tune in on CNN (Crap No News) to watch them and get brainwashed.. They will tell you that unless you give tax breaks to rich, no jobs will be created (I know this will be left for Presidential debates and may not be here on this GOP debate) though the fact is Bush's tax breaks caused more job loss and pain for the economy..but anyway, I am planning to go on Mt McCoy today evening and take few more shots with some zoom lens. At least, I know I will be able to enjoy beautiful sunset. Interested in joining for a hike and taking photos?
#GOPDebate #RepublicanDebate #simivalley#ReaganLibrary

Here are two photos that show you what your mobile phone can't do. It can't zoom in!

Here is a photo taken with a mobile phone. You can barely see the Presidential Library in the photo below. It was almost a mile away! See the next two photos taken with a regular camera- Panasonic FZ200. You can not only see the library but also the Air Force 1 plane inside!

Samsung Note 4 photo

Zoomed in photo


Thursday, June 18, 2015

How to take wide angle photos with a cell phone: Hollywood Sign- from a good to a great photo in 5 seconds.

This weekend, I took a friend to hike on the Mt Lee which has world famous Hollywood sign on. This is a very nice, popular hike in LA. It is sad that the residents of the area, near Beachwood Rd, have made parking a nightmare. Most of the spots require permit so you really need to know me well to get some inside tips on where to park when you are thinking on hike on the Hollywood Sign hike- Mt Lee. Anyway, this is a photography blog so I don't want to bore you with hiking details.

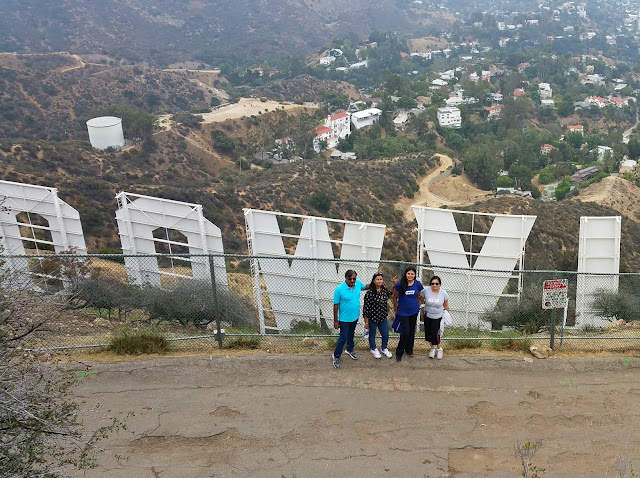
When reached the top of Mt Lee, we were above (behind) the famous Hollywood sign. We want to take a photo but when I took a photo with my camera, unfortunately my camera did not have wide angle necessary to get the whole sign in the background. Immediately, I had an idea. I took a regular photo with my Samsung Note 4 camera.
Hollywood sign hike
Hollywood Sign hike
Still the cell phone camera was not wide angle enough. So I changed the setting to Panaroma and moved my camera left to right. Within 5 more seconds, I had the whole sign in the background. It is all trial and error photography. Once I found what problem I had, I tried to find a solution and I had a nice photo.
Beautiful Hollywood sign photo
Trial and error photography- one easy way to take great photos.

Tuesday, June 2, 2015

Take a better photo by moving people around with Trial and Error Photography

Yesterday I was taking photos at my son's school - Vista Fundamental Elementary School in Simi Valley. 3rd Grade classes had Apple Valley days and there was graduation ceremony. After the event was over, my wife and some of other moms asked me to take there photo. It was a mid day with harsh Sun. Luckily they were standing under a tree. I knew that under the shade, I had better chances for taking a good shot. However I didn't know in which direction to stand them. As most of us know, light is a very important factor in photography. In open space, there are variety of things that reflect light of different quality and in different directions. Brighter surfaces reflect more light and some surfaces make light even softer. I didn't know which direction which spot will work the best. As I wasn't sure, I decided to stand them in 2-3 different directions and take photos.

Here is the first photo.
Day light portrait
Daylight portrait

I made them face South direction. Probably the background was too bright or may be the grass below didn't reflect back light well. Photo didn't come out good. I wasn't happy plus I like to try to take a better photo. I moved them to face the East. Look at the second photo:
ladies group portrait
Facing East.

Photos in natural lightWhen this group of ladies faced East, the photo got worse. Now I knew if I ask them more times, I would get in trouble. Other 3 moms would probably not show their annoyance but I wasn't sure about my wife. Anyway, I wanted to take one more chance. I asked them stand facing the West. Somehow it worked very well. I took 2 quick photos. I showed photos to them and I know all 4 of them were happy. They complemented me for being a good photographer. Photos did come out bright with natural skin tones. We were able to use natural light to make a nice group photos for these 4 moms. For me, it was just a Trial and Error way of photography.  As I keep saying, photography shouldn't be that tough. We don't need to take classes or get into technical theories. Follow two simple steps of Trial and Error Photography. Take a shot. Find an issue and try to correct it.

Enjoy photography.


Friday, May 15, 2015

Trial and Error with quick cell phone photography

When you take a photo with a cell phone and if you want to take a better photo, Trial and Error Photography can help you quickly and without too much effort.

It was a nice rainy day in Los Angeles. When I looked outside through glass window, loved the clouds, blue sky and soft light on the trees and building structures. I wanted to take a good photo. So first I took a photo in default mode. Then, thankfully on my phone camera, I can use Exposure Compensation. I changed it to EV 1.5 and took a photo. Then turned on HDR (which automatically brought EV back to zero) and took the third photo. Look at these 3 photos taken within 30 seconds. Then I compared them and kept the one I liked.
Here are 3 photos. Tell me which one you like!
Don't you agree that it is easy to take better photos with Trial and Error method?

Photo in default Auto mode:
Photos in Auto mode

Photo with Exposure Compensation:
Photo with Exposure Compensation


Photo in HDR mode:
HDR mode

Monday, May 4, 2015

RAW vs JPG image- which format is better?

I never shot in RAW format...until yesterday. It was sunset time and the colors were coming very saturated in photos I was taking with Panasonic FZ200. I decided to try RAW format. Here are two photos- one out of box with Jpeg and the second one is converted from a RAW image. In RAW vs JPEG comparison, I am sold to RAW format now. Wish I had started using RAW format earlier :(
Photo in JPEG format out of the camera.

Image shot in RAW format


Here is one more example of Raw vs Jpeg.
Out of camera jpeg image

Jpeg from a raw image.

Friday, April 3, 2015

Cell Phone camera vs DSLR camera in landscape/ day light photography

When it comes to landscape photography in good day light, it really does not matter what kind of camera you have. With abundant light, there is no need for a fast lens or a big sensor. Also, in landscape photography, you want to keep most of things in nature. Smaller sensors and tiny lenses are naturally capable of keeping everything in focus.
I was at Mary Lake in Mammoth Lakes area. I have a Pentax K-30 dSLR, Panasonic FZ100 24x zoom and Samsung Note 4 mobile phone camera. Here are some photos. As you can see, they all took good/comparable photos.


Here are two more photos of taken around same place same time:
Here is a photo with a cell phone:


Here is a similar photo with a camera/DSLR: